After your seeds have germinated, it will soon be time to transfer the seedlings into your tower. This is an exciting step, similar to sending your kids off to school. You've nurtured them up until now, and it's time to let them flourish. From here, things get easier since the automated watering and lighting of your tower garden takes over. All you need to do is monitor water levels and ensure the nutrient and pH levels are balanced. We’ll show you how to do this as you read down below. Watching your plants grow is a truly rewarding experience!
Starting and growing a tower garden comes with a range of benefits. You’ll read about growing organic food without pesticides, recycling water, harvesting faster than soil, and how they maximize space. All of this is true.
But there’s ONE benefit that really hits home only after you’ve set up your tower garden: having farm-fresh food at your fingertips! It’s an experience that’s hard to fully grasp until you’ve tasted the difference yourself. The aroma of freshly picked basil as you add it to your pasta sauce is a rewarding experience. Having a sandwich with home-grown lettuce is satisfying in more ways than one. The joy of growing your own food in your garden tower! And just how fun and enjoyable the whole process is. It’s a hobby that’s both fun and fulfilling.
We’re going to walk you through some steps to make sure you get the most out of your tower garden. Assembly takes about 20 minutes. No tools are required since the parts snap together and are hand-tightened.
Step-by-Step Guide
Assemble
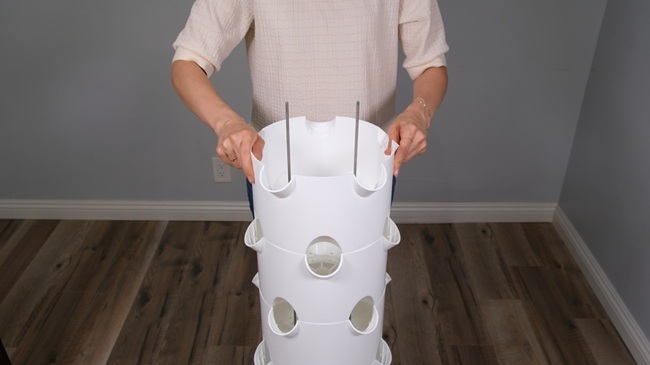
Put your tower together in 20 to 30 minutes. No tools are necessary. Follow the video below.
Prep the Reservoir
Add water and nutrients. A + B plant food is included with all towers. Test and adjust the pH.
Transfer Seedlings
Place seedlings in the net pots and insert into the tower. Watering and lighting is automated.
Assembling Your Tower
What's in the Box
ALTO Garden towers arrive in one box. Inside, you’ll find everything you need to set up your tower garden, including all the essential components: the tower structure, reservoir tank with wheels, broad-spectrum LED lights with a built-in timer, a water pump, a timer for the pump, net pots for planting, and a water gauge to help you monitor water levels. Everything you need to start your garden tower is at your fingertips.
You will also receive a free starter kit in the box with the following items:
Most of these items are neatly packed inside the reservoir tank — since we don’t ship water, it’s the perfect space to pack things!
Once you get everything out of the box, lay things out on the floor. The included instruction manual has a list of contents on the first page, so check your contents so you know what each part is. Some items are really obvious – like the reservoir tank and the 6 tower layers. But there are also some smaller components as well so taking inventory of everything is a good first step.
Preparing the Reservoir
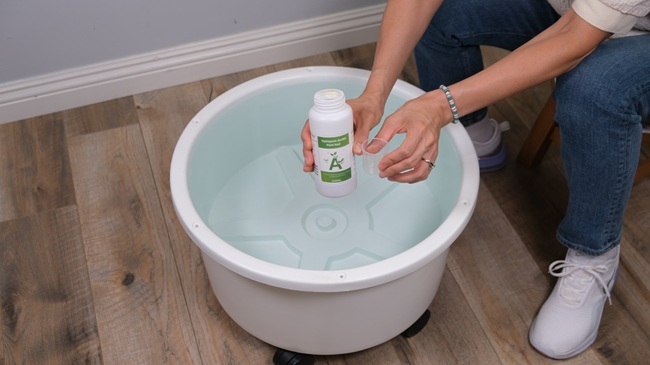
Step 1: Add Water. Add plain tap water to the reservoir tank, filling the reservoir until you almost reach the the top. Once you have water in your reservoir we can add the nutrients and pH solutions discussed below. Do not use softened water, or chlorinated water.
Step 2: Add Nutrients. There are many types of nutrients but we recommend a simple solution of Type A + B plant nutrients. Just do a search for “A + B Plant Nutrients” – this is all you need and it works great. Add the correct MLs per gallon according to the instructions on the label. Once the nutrients have been added, stir.
Step 3: Test and Adjust pH. Nutrients will fluctuate the pH a little bit, so it's best to test and adjust pH AFTER you’ve added your nutrients. pH should be between 5.5 – 6.5. But note that pH tends to drift upward over time, so try to get it closer to 5.5. If you leave it at 5.5 for example, it will probably drift towards 6.0 in a week or so.
pH is important because your plants can’t absorb the nutrients if the pH is off. You can read our blog article on the importance of pH for more on this topic.
pH solutions (pH up and pH down) are powerful so just add a little bit at a time. Just a little bit of solution can make a big change. If you're at 7.5, bring it down gently with pH down. Add a little bit and re-test. Then add some more, re-test, and repeat until you’ve reached your desired levels. Don’t over-correct with pH down, and then use pH up to raise it again. Try to avoid adjusting pH in both directions.
Transferring Seedlings : A Simple Guide
Seedlings are ready to be transferred when you see the following signs:
• Four leaves have formed (the best sign) – This is the clearest indicator. The first two leaves you'll see are called cotyledons, which are part of the seed embryo. Wait for two more leaves to appear, bringing the total to four leaves.
• Roots are growing out from the bottom of the rockwool – When you notice roots emerging from the bottom of the rockwool cubes, it's a good sign that your seedlings are ready to move to the garden tower. These roots typically grow downward as they search for water in the germination tray.
• Seedlings reach 1 – 2 inches tall – By the time they reach this height, they usually have four leaves and are ready for transfer into your tower garden.
Transferring seedlings is really easy:
Step 1: Remove any extra seedlings (if applicable). Generally, rockwool cubes can support only one-full grown plant at a time. If you planted extra seeds during germination for redundancy reasons, now is the time to remove them before transferring into your tower.
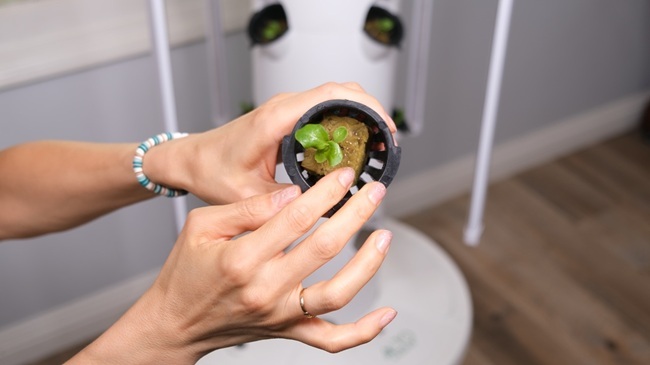
Step 2: Insert the seedling into net pot. Pick up your seedling and insert the rockwool cube into the net pot. Be gentle with the seedling; grab a hold of the rockwool and not the plant.
Step 3: Insert the net pot into your tower. Drop your net pot into an open slot in your tower. Repeat this process until all of your seedlings are transferred.
About Lighting and Watering Schedules
Lighting Schedule
Setting your lighting schedule is pretty straight forward. A good starting point for lighting your tower garden is 14 hours on and 10 hours off. Set this schedule to start and adjust from there. Don’t leave your lights on 24 hours a day, since it is important for your plants have a dark cycle. Just like humans, plants need their rest too!
Watering Schedule
With hydroponic towers you set your watering schedule as a watering interval. Meaning you don't water continuously for 24 hours. Instead, watering is set for on-and-off periods. Using interval-based watering is a hydroponic method known as “aeroponics.” With aeroponics your plant roots are exposed longer to air than they are to water, throughout the course of the day! Having your roots suspended in air makes oxygen more accessible which accelerates plant growth. This is different than other hydroponic growing methods, which may leave roots submerged underwater 24 hours for example.
Your watering interval will largely depend on whether you’re growing indoors or outdoors, and the temperature. Below are some recommended guidelines, but you’ll need to exercise your judgement as well and adjust as needed.
Some example watering intervals:
| Indoor Cool | Indoor Warm | Outdoor Fall / Spring | Outdoor Summer |
|---|---|---|---|
| 15 minutes on | 15 minutes on | 15 minutes on | 15 minutes on |
| 45 minutes off | 45 minutes off | 45 minutes off | 30 minutes off |
| 14 - 15 hours a day | 17 - 18 hours a day | 18 - 20 hours a day | 20 - 24 hours a day |
Maintaining pH, Water and Nutrient Levels
By now, your reservoir is filled with nutrient-rich, pH-balanced water, your seedlings are safely transferred into the tower, and the timers are all set — congratulations! Your plants are all set to grow and thrive, and it’s incredibly rewarding to watch them get bigger every day.
While most of your time will be spent enjoying your plants’ growth, it’s still important to maintain the pH, water, and nutrient levels in your reservoir to ensure your garden tower continues to flourish.
Maintaining pH Levels
pH levels in your reservoir will naturally change over time. As water circulates up and down your tower, pH levels tend to drift upward. Test pH once a week to ensure it remains within the ideal range. A pH test pen is included with your tower, which makes it easy to check the levels through the observation window at the base of the reservoir. If you find that the pH is too high, adjust it with pH Down to bring it back within the ideal range of 5.5 to 6.5.
Maintaining Water and Nutrient Levels
Water evaporates over time, especially in warmer conditions, so monitor your water levels. Without enough water, your plants won’t thrive. Always ensure the reservoir has enough water for the pump to circulate it up and down the tower.
At a minimum, your reservoir should be at least 1/4 to 1/3 full at all times — the pump needs to remain fully submerged to operate smoothly.
Note: Don't add more nutrients to existing water in the reservoir — remember, that water has already been treated. Add nutrients to fresh water, and add that water to the reservoir. When it’s time to refill, use a separate bucket. Treat the fresh water with A + B nutrients and adjust pH before adding it to the reservoir.
Harvesting Your Tower Garden
In just a few weeks, your tower garden will be ready for harvest. There are three main methods for harvesting your hydroponic tower, each offering unique benefits.
Cut-and-Come-Again (Recommended)
With the “cut-and-come-again” method, you harvest the outer-bottom parts of the plant, and leave the rest of the plant to continue growing. Simply grab the base of the leaf or stem, and give it a twist with your fingers. This technique will detach the leaf or stem from the rest of the plant.
This method allows you to continually harvest the same plant throughout the season. New leaves will appear and grow, so you can come back and harvest again. This is our favorite harvesting method and the one we most recommend. It yields the most food over the long-run.
Cut The Entire Plant at its Base
For this method, you will need a knife. Bunch all of the leaves together with your hand, and with your other hand use a knife to cut across the bottom of the leaves. Make sure to keep 2 – 3 inches of leaves at the bottom of the plant. The key to this method is cutting across the bottom of the leaves (not the stem), keeping the bottoms intact so they grow back.
Although the leaves will grow back, the volume will be much lower the second time you come around. But the advantage of this method is that it’s fast, and you’ll have more food right away.
Pull the Entire Plant from the Tower
This is another fast method of harvesting. For this method, simply pull the entire plant from the tower. You can remove the rockwool cube by cutting it off. Prepare the rest of the plant for your meal.
Of course - the disadvantage of this method, is you are harvesting the whole plant so there's nothing to grow back. But if you time your germination cycles right, you can replace your plant with a new seedling which will be ready to be harvested in a few weeks.
FAQ
When should I transfer seedlings to my garden tower?
Seedlings can be transferred to your tower when four leaves have formed, and you can see roots growing out from the bottom of the rockwool cube.
How does the tower garden system help with plant growth?
The automated watering and lighting system in the tower garden helps plants thrive with minimal effort.
How often should I check and adjust the pH levels in my tower garden?
It's recommended to check the pH levels of your tower garden's water 1-2 times per week. As water circulates through the system, pH levels may fluctuate, so regular testing ensures they remain within the ideal range of 5.5 to 6.5 for optimal plant growth.
How much water should I maintain in the reservoir for my tower garden?
At a minimum - the reservoir should be kept at least 1/4 to 1/3 full at all times. The pump needs to be completely submerged to operate smoothly. Always monitor the water level and refill when necessary to keep your plants hydrated and thriving.
Do tower gardens require a lot of maintenance?
Tower gardens are low-maintenance but do require some regular attention. For example - you'll need to monitor pH and water levels. Compared to traditional gardening, tower gardens require a lot less time and effort, and the automated features simplify the process significantly.


